

Get the printer on the same network as your computers, then add it to each device. That’s the whole job. In practice, it breaks into three steps: connect the printer to your LAN (via Ethernet cable or Wi-Fi), add it in Windows or macOS, then print a test page to confirm. If you’re setting this up for a shared office or a point-of-sale system, add one more step: reserve a static IP in your router so the printer’s address never changes after a restart.
-
Connect the printer to your network (Ethernet or Wi-Fi).
-
Add the printer on each computer using automatic discovery or a manual IP entry.
-
Print a test page to verify the connection.
For shared print servers or POS setups: Reserve a static IP address in your router’s DHCP settings before you start. A printer that changes address after every reboot will break every device connected to it.
Key Takeaways
A successful network printer setup comes down to three things: the printer and computers must share the same network, the correct protocol and driver must be selected during installation, and the printer’s IP address must stay stable.
| Point | Details |
|---|---|
| Same network is non-negotiable | Printer and computers must be on the same LAN, same SSID, and same subnet for discovery to work. |
| Try automatic discovery first | Windows Settings > Printers & scanners and macOS Printers & Scanners both detect most printers automatically. |
| Use IP address as the reliable fallback | Manual TCP/IP (Windows) or IP tab (macOS) with IPP on port 631 works when discovery fails. |
| Reserve a static IP for shared printers | DHCP address changes after a router restart break every device pointing to the old address. |
| GOM for hardware and on-site support | GOM supplies business printers and provides on-site setup and managed print services across Australia. |
Table of Contents
How do you connect a printer to your network?
Two paths: Ethernet or Wi-Fi. Ethernet is faster to set up and more reliable, especially in an office with multiple users. Wi-Fi works well for smaller setups where running a cable isn’t practical.
Ethernet connection:
-
Plug one end of a standard RJ-45 cable into the printer’s LAN port and the other into your router or network switch.
-
Power on the printer. Check the port LEDs: a solid or blinking link/activity light confirms a physical connection.
-
Print a network configuration page from the printer’s control panel to confirm it received an IP address.
Wi-Fi connection:
-
On the printer’s control panel, navigate to Network or Wireless Settings, then select Wi-Fi Setup Wizard.
-
Choose your network SSID and enter the password.
-
Alternatively, press the WPS button on your router, then press the WPS button on the printer within two minutes. The printer joins the network automatically.
Before you proceed, check these:
-
The printer and all computers are on the same network (same router, same SSID for Wi-Fi).
-
If your router broadcasts both 2.4 GHz and 5 GHz bands under different names, connect the printer to the same band as your computers. Many older printers only support 2.4 GHz.
-
Printer firmware is up to date. Outdated firmware causes discovery failures that look like network problems.
Pro Tip: For any printer used by multiple people or connected to a POS system, reserve a static IP in your router’s DHCP settings. Assign the reservation to the printer’s MAC address so it always gets the same address, even after a power cycle. This prevents the “printer not found” errors that appear when DHCP hands out a new address.
For small offices mixing wired and wireless devices, planning your network hardware — router, switch, and access points — before adding printers saves a lot of troubleshooting later.
How to add a network printer on Windows
Windows tries automatic discovery first. If that fails, the manual TCP/IP route almost always works.
Automatic discovery
-
Open Settings (Win + I) and go to Bluetooth & devices > Printers & scanners.
-
Click Add device. Windows scans the network and lists available printers.
-
When your printer appears, click Add device next to it.
-
Windows installs a driver automatically. Once complete, right-click the printer and select Print a test page.
Microsoft’s add-printer documentation covers both the automatic discovery flow and the manual fallback in detail.
Manual add (when the printer doesn’t appear)
-
In Printers & scanners, click Add device, wait a moment, then click The printer that I want isn’t listed.
-
Select Add a printer using a TCP/IP address or hostname and click Next.
-
Enter the printer’s IP address (see the “How to find a printer’s IP address” section below if you don’t have it).
-
Windows detects the port type. For most modern printers, leave it as Standard TCP/IP Port.
-
Choose a driver: Windows built-in drivers cover most HP, Canon, Epson, and Brother models. If print quality is poor or features are missing, download the manufacturer’s full driver from their website. For office laser printers, you’ll often see a choice between PCL and PostScript drivers. PCL works for general office printing; PostScript is better for design work or when printing from Adobe applications.
-
Name the printer, set it as default if needed, and print a test page.
Driver tip: Windows built-in drivers are fine for basic printing. Download the manufacturer’s driver when you need full access to duplex settings, tray selection, or finishing options.
Sharing a Windows-hosted printer
If the printer is physically connected to one Windows PC and you want other computers to use it:
-
On the host PC, set the network profile to Private (Settings > Network & internet > your connection > Network profile type).
-
Go to Settings > Bluetooth & devices > Printers & scanners, click the printer, then Printer properties > Sharing tab, and check Share this printer.
-
Enable Network discovery and File and printer sharing in Advanced sharing settings.
Microsoft’s sharing guide is clear on this: The host PC must stay on and connected for other devices to print. If the host sleeps or shuts down, the shared printer goes offline for everyone else.
How to add a network printer on macOS
macOS handles most modern network printers automatically through AirPrint and Bonjour. The manual IP method is the reliable fallback.
AirPrint/Bonjour automatic add
-
Open System Settings (macOS Ventura and later) or System Preferences (older macOS) and go to Printers & Scanners.
-
Click the + button (or Add Printer, Scanner, or Fax).
-
In the Default tab, macOS lists printers it has discovered via Bonjour. Select your printer.
-
Under Use, confirm it shows AirPrint or the correct vendor driver. Click Add.
-
Print a test page from any application (File > Print > Print).
Manual IP add-on macOS
-
In Printers & Scanners, click + to open the Add Printer dialogue.
-
Click the IP tab.
-
Enter the printer’s IP address in the Address field.
-
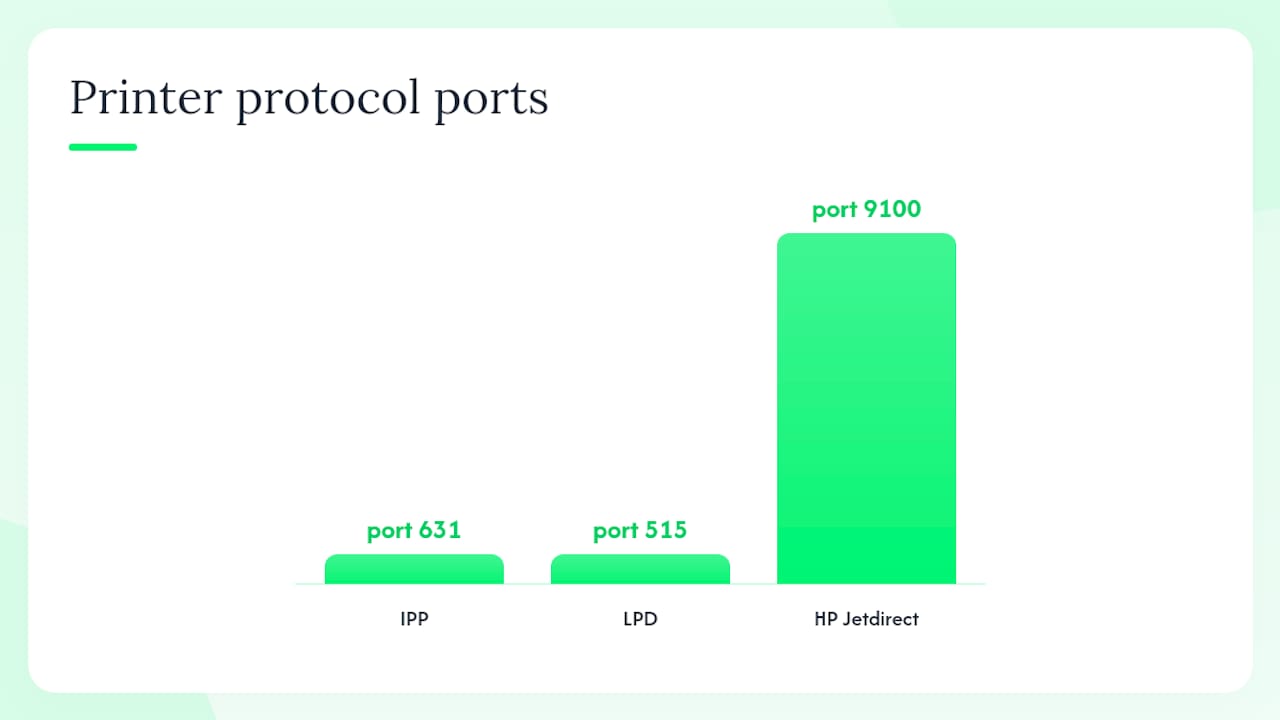
Choose a protocol. IPP (Internet Printing Protocol, port 631) is the right choice for most modern printers. Use LPD (port 515) for older Unix-style print queues. Use HP Jetdirect (port 9100) for HP printers that don’t respond to IPP.
-
Leave Queue blank unless your printer’s documentation specifies one.
-
Under Use, select AirPrint if available, or choose the vendor’s CUPS driver from the list. If nothing matches, download the driver from the manufacturer’s website.
-
Click Add.
Apple’s support documentation covers both the Bonjour discovery path and manual IP installation, including how to use the printer’s self-test page to find the IP address.
Pro Tip: If macOS shows the same printer twice (once via USB, once via network), remove both entries in Printers & Scanners, then right-click the printers list and select Reset printing system*. Start fresh with the network-only entry. Duplicate entries cause jobs to queue on the wrong connection.*
How to add a printer by IP address on Windows and macOS
Manual IP installation is the go-to method when a printer won’t appear in automatic discovery, sits on a different VLAN or subnet, or needs a fixed address for a POS system. It’s also the most reliable long-term approach for any office printer used by more than two or three people.
Windows: step-by-step
-
Open Control Panel > Devices and Printers > Add a printer.
-
Click The printer that I want isn’t listed.
-
Select Add a printer using a TCP/IP address or hostname and click Next.
-
Type the printer’s IP address. Leave Device type as TCP/IP Device.
-
Uncheck Query the printer and automatically select the driver if you want to choose the driver manually.
-
Select or install the driver, name the printer, and print a test page.
macOS: step-by-step
-
Go to System Settings > Printers & Scanners, click +.
-
Select the IP tab.
-
Enter the IP address and select the protocol (IPP is the default; switch to LPD or HP Jetdirect if IPP fails).
-
Choose the correct driver under Use and click Add.
Protocol comparison
| Protocol | When to use | Typical port |
|---|---|---|
| IPP | Most modern network printers (recommended default) | 631 |
| LPD | Older printers, Unix/Linux print queues | 515 |
| HP Jetdirect/TCP | HP printers not responding to IPP | 9100 |
Verification steps after adding by IP:
-
Open a command prompt (Windows) or Terminal (macOS) and run
ping <printer IP>. A response confirms network reachability. -
Open a browser and go to
http://<printer IP>. Most network printers serve an Embedded Web Server (EWS) at that address, showing status, ink levels, and network settings. -
Print a configuration page from the printer’s control panel to confirm the IP matches what you entered.
How do you find a printer’s IP address?
Four methods, from fastest to most involved:
-
Printer control panel or display: Most printers show the current IP address under Network Settings, Wi-Fi Status, or Network Information in the menu. Check there first.
-
Print a self-test or configuration page: On almost every network printer, holding a button combination (varies by model) or navigating to Reports > Network Configuration Page prints a sheet that lists the IP address, MAC address, and connection status. Star WebPRNT printers, for example, print a self-test page that shows the current IP and allows static IP configuration through the printer’s web admin interface.
-
Router DHCP client table: Log into your router’s admin page (usually
192.168.1.1or192.168.0.1), navigate to Connected Devices or DHCP Client List, and find the printer by its hostname or MAC address. The assigned IP appears in that table. -
Network scan from a computer: On Windows, open Command Prompt and run
arp -ato list all devices on the subnet with their IP and MAC addresses. On macOS, open Terminal and runarp -a. Match the MAC address to your printer’s MAC (printed on the label on the printer’s underside or back panel).
Troubleshooting common network printer problems
Most “printer not found” or “printer offline” issues trace back to a handful of causes. Work through this checklist before assuming a hardware fault.
General checks (all platforms):
-
Confirm the printer is powered on and shows a ready or idle status, not an error.
-
Check the Ethernet cable or Wi-Fi signal. A disconnected cable or weak Wi-Fi signal is the most common cause of sudden printer loss.
-
Ping the printer IP from a computer. No response means a network connectivity problem, not a driver problem.
-
Open the printer’s EWS in a browser or type
http://<printer IP>). If the page loads, the printer is on the network, and the problem is on the computer side. -
Lexmark’s troubleshooting guide recommends verifying port selection and checking for duplicate DHCP addresses as primary steps when a network printer stops responding.
Windows-specific fixes:
-
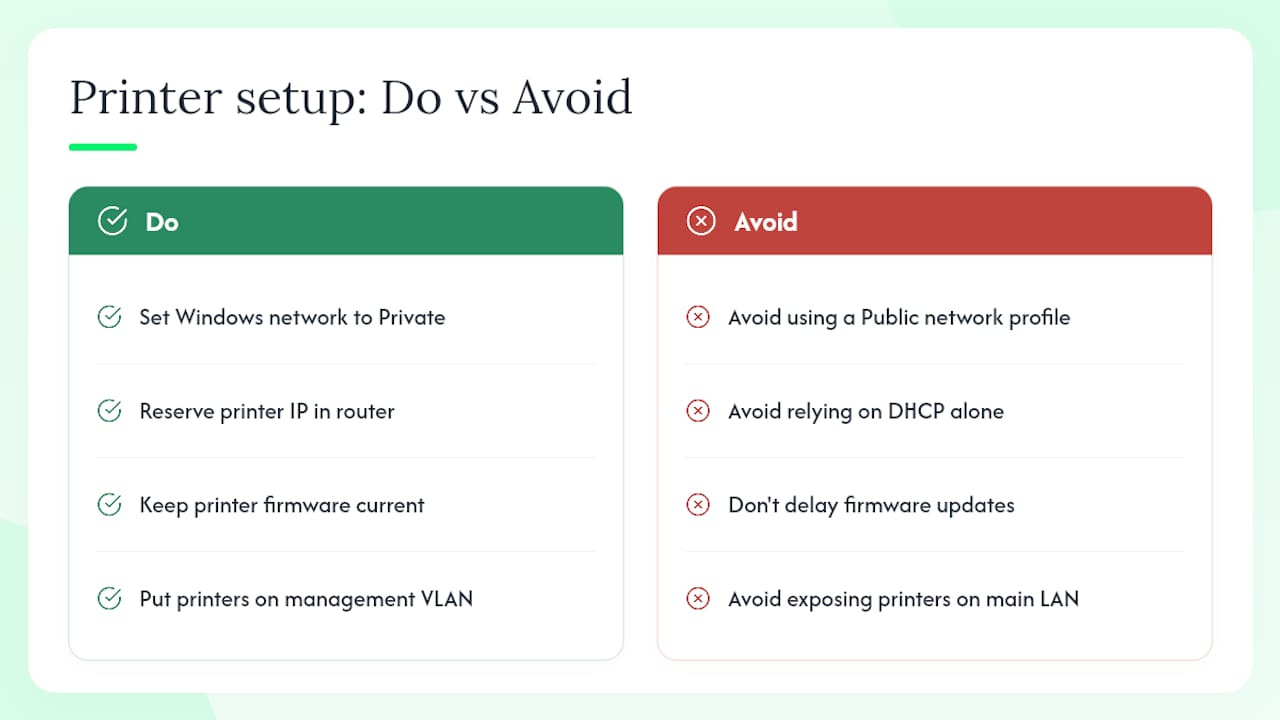
Set the network profile to Private. A Public network profile blocks printer discovery. This single change fixes the problem in a surprising number of small-office cases.
-
Enable File and Printer Sharing in Advanced sharing settings under Network & Internet.
-
Clear the print queue: open Services, restart the Print Spooler service, then delete files in
C:\Windows\System32\spool\PRINTERS. -
Update or reinstall the driver from the manufacturer’s website. If the driver is corrupt, no amount of network troubleshooting will fix it.
-
Check Windows Firewall: confirm it allows traffic on TCP port 631 (IPP) or 9100 (HP Jetdirect).
macOS-specific fixes:
-
Remove the printer entry and re-add it using AirPrint or the IP method.
-
Brother Australia’s troubleshooting steps for Mac printing failures include restarting both devices, reinstalling the correct CUPS or AirPrint driver, and checking firewall settings. Follow that sequence before anything more drastic.
-
If nothing works, right-click the printers list in Printers & Scanners and select Reset printing system. This removes all printers and clears CUPS. Re-add the printer fresh.
Red flags that usually need more than a self-fix:
-
The printer gets a different IP address every time it restarts (DHCP conflict or no reservation set).
-
Computers on one part of the office can print but others can’t (subnet or VLAN segmentation).
-
The printer appears online, but jobs disappear without printing (hardware NIC fault or print server misconfiguration).
When should you call a technician?
Some problems are genuinely beyond what a settings change can fix. Call for on-site support when:
-
The printer’s network interface card (NIC) is faulty. Symptoms: the printer connects briefly, then drops, regardless of cable or Wi-Fi.
-
Your office has multiple VLANs or subnets, and the printer needs to be accessible across them. This requires router or managed-switch configuration.
-
A print server is misconfigured, and jobs from multiple devices are routing incorrectly.
-
You’re setting up printing across multiple sites or over a VPN.
-
IP conflicts keep recurring despite DHCP reservations being set.
Before you call, collect this information:
-
Printer make, model, and serial number (on the label, usually underneath or on the back).
-
Printer MAC address and current IP address (from the configuration page).
-
Router make and model.
-
Screenshots of any error messages on the printer display or computer.
-
Which computers can print and which can’t (helps isolate whether it’s a network or device issue).
GOM’s technicians handle on-site printer repairs and network configuration for small and medium offices across Australia. For offices with complex setups, a managed print service removes the ongoing maintenance burden entirely.
What the field actually teaches you about printer setup
The steps in this guide are correct. What they can’t fully convey is how often the same two or three mistakes cause the vast majority of calls.
The first is the network profile setting on Windows. A computer set to “Public” network blocks printer discovery completely, and the error message gives no hint that’s the cause. Technicians frequently see this issue in small offices when a new device uses a public network profile instead of a private one.
The second is DHCP address drift. A printer that worked perfectly can suddenly go offline after a router restart because it got a new IP. Every device that had the old address saved is now pointing at nothing. Reserving the printer’s IP in the router, as Square’s Australian support documentation recommends for POS connections, can prevent this permanently.
The third is firmware. Printer manufacturers push firmware updates that fix Wi-Fi compatibility bugs, improve Bonjour/AirPrint discovery, and patch security vulnerabilities. An unpatched printer on a business network is both a connectivity risk and a security one. For offices, putting printers on a dedicated management VLAN adds another layer of protection: it limits who can reach the printer’s EWS and prevents a compromised device from using the printer as a pivot point.
GOM has been servicing Australian businesses since 1996 as a 100% Australian-owned authorised dealership. The pattern across those years is consistent: the offices with the fewest printer problems are the ones that reserved IPs, kept firmware current, and called for help before a small issue became a network-wide outage.
GOM can handle setup, hardware, and ongoing support
Getting a printer online is straightforward when the network is clean, and the hardware is healthy. When it’s not, the time spent troubleshooting adds up fast.
GOM supplies and services business printers, multifunction devices, and plotters across Australia, with on-site repair technicians and managed print contracts for offices that want the problem handled rather than diagnosed. Whether you need a reliable office multifunction printer that connects cleanly to your network from day one, or an on-site technician to sort out a persistent connectivity issue, GOM covers both.
-
Book on-site support for network printer installation, IP configuration, or driver troubleshooting.
-
Request a managed print quote for ongoing maintenance, consumables supply, and proactive servicing.
-
Browse business printers and consumables at the GOM shop with nationwide delivery.